Thursday, December 15, 2011

Haul the Decks.

An orang-utan goes into a bar and says to the barman:

“May I have a gin…………and tonic, please?”

The barman says: “Why the long paws?”

We are well into fitting out the boat and the list of tasks to be completed is really quite short. It’s more interesting, now, as we are fabricating parts where there’s plenty of room for creativity (it’s not an exact science). The big item left will be the application of multiple coats of epoxy, varnish and (for the gunwales and thwarts) oil.

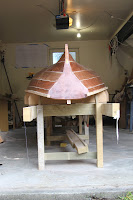
We tackled making the decking in the last month. A series of joists were fitted across the bottom planks to support the removable deck. This will allow us to walk the length of the boat in order to get to the drinks cabinet (design not finalised), or to enable the rowers to have a stand up fight over some fine point of technique.

Simple: three planks (Fijian Kauri), shaped to match the curve of the hull, braced with ply battens, which we made from the scrap from the original kit:


What was very exciting was the result of applying several coats of Danish oil,which gives a soft, durable sheen. We shall have to remember to refresh it every couple of years, but it’s what the yacht builders use, so it should be good.


Joe after applying the oil: the shine wears off leaving a smooth satin finish. This will happen to the deck, too.

In the meantime, we have also been working on knees, breasthook, thwarts and cleats. Cue for a song? Joe will probably tell you about our new toy, too. With a week to go before we stop for Christmas, the aim is to have all the bits made and ready for fitting...here's hoping.


Sunday, November 6, 2011

Up to the Gunwales in Sawdust

Welcome back.

Well, the Rugby World Cup imposed a bit of a go-slow on the boat building process. Priority being given to watching the matches over standing over the boat sanding the inside.

A word of warning, if you ever build a boat, and in particular a boat that you build upside down on a strongback, take an extra ten minutes wiping the excess glue off the inside of the hull after you've glued anything on the outside. I would say that we have spent about 20 hours sanding and scraping the inside of the hull. A particularly tedious and soul destroying task.

So, to break the monotony, we did some other jobs in parallel, mostly to stop us going insane with boredom.

Firstly, we've fitted the gunwales. This involved more clamps, a couple of brass retaining screws, a lot of glue, some steam, a router, a spokeshave, some sandpaper, and a firm conviction that "it's not an exact science". To describe the process would be complicated - so I used all my wordart skills and drew this cross section.


Stick the side bit to the boat, then the glue the cap to the side bit and the boat, then remove all the bits that are outside the dotted line with a curved router. It says on the instructions that you aren't to use those blades "freehand" but I couldn't see a problem. Anyway, as with the "David", start with a lump of wood and chip away all the bits that don't look like Michelangelo.

And just to show you that we are doing something, here's me, manhandling a very dangerous power-tool, covered in bits of gunwale. You can see the gunwale side has been added to the starboard side of the boat. You can also see I am losing my hair at an alarming rate!

Don't put your fingers there!

Wednesday, August 31, 2011

Beervana

I went to the beer festival, I was looking for the dogfish head guy, he seems to have the best job in the world, but he wasn't there. I did manage to chat to a couple of the brewers. One in particular only revealed himself as the brewer after I had described his  "Rex Attitude" beer  (Yeastie Boys brewery)  as "Like mud on a hospital floor, a combination of peat and disinfectant." I was surprised to find that this was the effect they were aiming for.

Anyway, none of this is getting our boat built.


It is however an opportunity to describe to our faithful readers (thanks to both of our Dads) what other projects inhabit my garage.


Being a good father, I have helped my sons in their various academic endeavours - in particular Jack's design tech projects. One of which was a re-cycling project. What better project than a recycled fridge a light bulb and a thermostat - the perfect environment for brewing beer. Jack built it, I took photo's of him working and he got a merit at school - the fact that he was 16 and making a brewery didn't seem to bother his design tech teacher. 

Anyone who brews beer knows that the worst part is bottling. There's a similarity between boat building and bottling - if you don't clean up immediately after yourself, the gunk, be it glue or sediment, it dries and its a bastard to clean. So, I discovered the concept of the kegorator, to use the vernacular. Instead of bottling you keg, and then you force CO2 into the keg at 4 degrees Centigrade for 48 hours and you have carbonated beer. For this you need a keg, or two, some tubes, a CO2 bottle, some CO2, a tap and an old fridge - here's one I prepared earlier.


Nice Kegs, shame about the face.
This is the 20ltr keg in the donor fridge, I picked this up from a really nice guy on Trademe for $40. The reconditioned Kegs you can pick up for about $80. The real expense is the bloody CO2 bottle, that little feller is a reconditioned unit from Porirua, a mere $220. Although it does come with 2 and a half litres of CO2. The regulator, tap and pipes weren't that cheap either.

"Kegarator"
So, here's the finished article,we have extracted 20 ltrs of Redwood Ale and 20 ltrs of Wheat beer from that tap so far. You will note I have improvised by using the floor as a drip tray.


If you look above the fridge you'll see a complicated nest of wires, an amplifier, an Airport express, an outdoor speaker (one of a pair) and a speaker switch. From my iPod, I can pipe music from here to the garage, outside on the deck or downstairs into the spa. Or any combination of the three. More on that another day. If you look closely in the foreground - there's a tub of Vaseline. Answers on a postcard....

Tuesday, August 16, 2011

Meanwhile, up North


It has got a bit nippy here in Wellington: they say it's the worst weather for 35 years. It is certainly unusual - I have never seen snow here in the 7 years since I arrived. Of course, much of the disruption it causes is simply because people are so unused to it.

Brooklyn in the snow

One effect of this is that it has not been possible for Joe and me to crack on with the task of scraping and sanding excess glue from the inside of the hull: I had to abandon my car this afternoon and Joe has no beer left, so it's too much to ask for him to go into his garage to face the desolate sight of an empty beer fridge.

In the meantime, Jock and his chums (see one of the earlier blogs) are making great progress towards the Magnetic North Pole.


Jock (centre, front) appears to have got his leg stuck in the ice.

Have a look at their website: it's exciting stuff: www.rowtothepole.com


Monday, August 15, 2011

Turnover Part Two


While Calico Joe was lounging under the boat, I was organising the hired help to do the important stuff: lifting the boat, carrying it out of the garage , turning it over and settling it onto the handmade cradles.


I was amazed at how light it was, even with half the moulds still in place: of course we need to fit decks, thwarts (seats) and foot stretchers, but even so, the challenge of the portages on the Great Journey down the Mighty Waikato might be a little more manageable than anticipated.

The moment when I saw the inside of the boat properly for the first time was quite special: I had steeled myself to seeing a mess of epoxy stalagmites, but it was surprisingly neat and the confluence of the planking on the inside of the boat was very beautiful.


We've kept the moulds in place to ensure the hull retains the correct shape until we are able to fit the remaining bracing components, though they do have the advantage of enabling us to have separate cabins in case we argue...


Just in passing, I note that everyone who came to the party urged us NOT to paint the hull. I'm just saying, that's all.


Sunday, August 14, 2011

Photo Blog - Turnover part one.

This entry will be largely dominated by photo's of the big turnover, cos we took a lot.

The garage has never been so tidy.

Here she is, covered in epoxy. The garage is clean and for those who have been following the blog, you'll recognise Harry's bike in the foreground.


Below is a last look at her upside down. Note the classic wine glass shape of the transom.

Chris and I spent the penultimate evening cleaning the garage and unscrewing the molds from the Strongback. Oh, and we built some supports for when she was the right way up. The big day was a busy one as Chris prepared food and Harry and I cleaned the bbq. Oh, and I went to get some sponge and calico (I'll explain later). We had invited the masters rowers, and anyone who was paying attention to the blog.
"Hands on!"
As you can see, Chris is talking and although you can't see it, I am under the boat working. No surprises there. The moment of truth was captured on video, but I think Chris has it, so you'll have to wait.
Click on the link - its a time-lapse gif (two seconds a frame).

Tuesday, August 9, 2011

Keel Over Party - Saturday

Party Party.

I heard a story of an Australian kid who posted a party on t'internet and 1/2 the town turned up, him and his sister had a great time.

A similar story about a kid in the UK posting her party on Facebook resulting in 250,000 pounds worth of damage, nobody actually turned up, she just happens to live in Hackney.

Anyway, the outside is done, we have sealed it with epoxy, sanded it, sealed it again and there are no more excuses, we're going to have to turn it over and see how much of the very expensive glue there is on the inside of the hull.

Is is traditional to invite your friends to the turning over ceremony - if only to lend us a hand.

If you know where I live, you are welcome to come and help us turn the boat over on Saturday afternoon "slash" evening, I'll try to knock something up on the bbq and will have a keg of "ale" that I have brewed. It needs tasting.

If you don't know where I live - get in touch - via the blog (leave a message and I'll get in touch).

Saturday from 4 pm bring a bottle or a glass. I'll make some burgers to feed the workers.

Tuesday, July 26, 2011

In the eye of the beholder

The month has gone by remarkably quickly. It felt that progress had slowed: we didn't manage too many sessions working on the boat and a couple of those were truncated by watching the Super 15 finals. Had you told me a few years ago that I would get fed up with watching Rugby, I wouldn't have believed you, but it has become a grind. Not helped by the dismal efforts of the Hurricanes, I suppose. Let's hope the World Cup will bring back some sparkle.

We did actually achieve quite a bit. Fitting the beautiful oak gunwales suddenly transformed a hull into a boat. Now apart from the tholes (rowlocks) and the rudder, the outside is pretty much complete (though we are still searching for inspiration for the ornament on the prow). The planks were 'filletted' - a bead of filler smoothed into the joints along the length of the boat - to ensure a watertight seal. We also spent a fair amount of time sanding. The discovery that the excess epoxy from our previous gluing and filling scraped off easily when we applied a paint stripping heat gun was a great relief and time saver.

Last night, though, was possibly the most satisfying session since we laid the first plank: we applied the first coat of the protective epoxy, with stunning results:


Shiny


It really does look this good: I think the great debate as to whether to paint or not has reopened. If you click on the picture you can zoom in pretty well and you'll see there are blemishes, including, of course, the scarph joints on each plank. However, there is an element of character and an honest portrayal of our first attempt at boatbuilding, which maybe should not be covered over... We shall see.

Saturday, July 2, 2011

Full Frontal.

Quick update, having sanded and planed and planed and sanded, the gooey mess that was the laminated stem looks like this.

No more glue.
As you can see, the hog looks a little off-line, and the boat needs a jolly good sand. The slight kinks are exaggerated by the shortening effect of the camera. They are hardly visible to the naked eye, and when we row, only fish will see it.

Wednesday, June 29, 2011

The Hog and Stem.

Sounds like a pub on the Thames somewhere, in fact it probably is.

Time for some more technical stuff.

We shaped and glued the Deadwood, as you all should know having read my previous post. Next step was the shaping and gluing of the stem, followed by the outer hog. For those who haven't built a boat before, which includes Chris and I, the outer stem is the bit at the front and the outer hog is the bit at the bottom.

That wasn't hard now was it?

Having decided to paint the hull, we decided that we could save ourselves the painful process of shaping the outer stem and mold the stem out of bits of off-cut ply. The trick being to build up the shape by laminating the strips of ply until we had enough depth.


Gluey Mess
Here's the first few strips of off-cut ply, it's pretty messy isn't it. The next picture is a bit of a close up of the mess, it serves to show that we are now confident we can make a bloody big mess and still get it looking good again.  By the way, we stuck about the same number of strips of ply to double the width.

Close up mess.
We set to the planks with our second hand planes, having established that Brendan's electric plane was far too dangerous - we risked "shaping" the boat through to the inner stem, otherwise known as creating an "hole in the boat" (Sorry for using all these technical nautical terms). I agonised over an upgrade to my $25 Stanley No 4 plane. They do this natty 170 mm plane that fits snugly into the palm of your hand. It also removes $120 from the palm of your hand. It would have been perfect, but having spent a whole blog renovating my plane, I was determined that we could do it. We also used Chris's wooden block plane, that I suspect was stolen from the early settlers museum.

Anyway, plane we did, and sand, and plane, and sand. You get the message. I have the results on another photo. But I am thinking I might go and see if my home brew has matured sufficiently for me to drink without nausea.

Piccies tomorrow.

Tuesday, June 14, 2011

Deadwood

One of my favorite TV shows, with Ian "Lovejoy" McShane swearing like the proverbial trooper.

Also, the bit at the bottom of the boat at the stern that forms a seamless joint between t'ransom to the outer hog. We have moved on from planking to a bit of woodwork. If you thought the planking was slowgoing and hard work,  prepare for some long gaps between blogs. This is the bit that moves from fitting kit prepared planks to a jig, to a more freehand approach to boat building.

Here is a picture of our first bit of real woodwork.


Having decided to paint the hull, the glue blobs will disappear.  And we'll give it a bit more of a rub with the sandpaper.

All the concerns we had about it looking a bit bulbous around the stern have been allayed by this little block of wood. This really makes the difference. Unfortunately, Chris won't let me glue one to his head, so he still looks a tad bulbous.

Looks good though, doesn't it.

Radio Silence

It is almost a month since we posted. Progress has been slow, thanks to the distractions of work and the fact that my boys, like the Queen, seem to have two birthdays each.
However, what we have done has been good and very satisfying - having emerged from the repetitive routine of the planking, it now feels as if each bit we add is a big step towards completion. Joe is preparing some pictures of what we've done - watch this space...

One of the most frequent debates we are having is whether to paint the hull or to apply a more natural wood-and-varnish finish. The scarph joints are pretty good, but do they add character, or serve as a slightly embarrassing chronological record of our progression up the learning curve?

I have always been reluctant to paint, but Joe came across this picture of the Badger's little brother, the Mole, which has gone a considerable way to convince me that a painted finish doesn't have to look like Tupperware.


http://www.harwoodwatercraft.com/The_Mole_At_Home.jpg


What do you think, dear blog reader?

Thursday, May 19, 2011

The last cut is the deepest.

I did my last scarf joint the other day. I just thought I'd say.

Chris did the last let in the bows.

I planed the last plank last night.

Chris was commenting, as he often does, that it's almost a shame that we've got to the last plank, because we've got into quite a rhythm in terms of scarf/glue/prepare/glue with the planks, and seem to have finally got the hang of it. He's right, it takes about 10 planks to become competent in planking. The benefit of this is that the later planks are above the waterline and therefore obviously more visible to the punters. The drawback is that our early work is below the waterline, so we'll probably sink.

Before
After.
The last scarf - Actually not one of my best, clearly familiarity does breed contempt.

Sunday, May 15, 2011

The Doldrums

 Someone asked me last night - "what happens in the doldrums?" The answer is nothing.

Nothing happens
A number of things have transpired to slow down progress on the boat.
  • I've got a huge project on at work.
  • Chris has been a bit "poorly"
  • Chris has been working in the bay of islands, when he's not been "a bit poorly"
  • My son broke his motorbike, so we've been replacing the engine.
  • Its winter, the garage is cold.
So, call this blog a stopgap, our very own boat-building doldrums.

In the meantime, let me tell you about Harry's bike, it's a tale of bad luck and worse judgement.

Harry, last in line to the O'Neill hundreds, has been pestering for a scooter, I flatly refused. They are pathetic, dangerous and require no skill or training. I wasn't having it. I said, if you get a bike, you get one with gears that keeps up with the traffic and you get some training.

Going Nowhere.
Having had his day with  Andrew Templeton, and got his license, we went on the hunt for a bike.

It transpired a guy at work was selling a GN250 - a very nice specimen too. (I think the GN stands for Go Nowhere). Here's a picture. So, I know the guy, and he gave me a very good deal, everyone was happy. Having got Harry kitted out in a load of expensive safety gear, I send him on his way.

Obviously, it all went horribly wrong, his bike broke and I had to buy a donor bike and replace the engine - to hear the full story, read the next bit. If you just want to know about the boat, and all things wood. Skip it. 

For a few weeks, all goes well, and then Harry and a mate decide to go for a proper ride. To date, Harry has been riding too and from school, a mere 2 or 3 kilometers. Barely getting the engine warm, which, as you will see, is quite a telling point.

So, Harry and "bray-bray" ask me to recommend good ride. I tell them to go up the coast to the Pauatahanui inlet (pronounced in-let) and up over Paikakariki (pronounced pie-cock) hill. Apparently the ride went so well, that they decided not to take my advice and come back down SH1, but go back the way they came. About halfway up the hill, Harry noticed a distinct lack of Braden in his mirrors, a little bit worrying if you've been over Paikak hill, there are some rather terminal drop offs. So Harry goes back in search of a break in the No 8. safety barrier. It transpires it's just a petrol issue. So Braden gets on the back of Harry's bike and they go in search of fuel. A series of envents involving a lift with a policeman, an argument with a grumpy - no, you can't put petrol in a 2 ltr coke bottle - petrol station attendant ends with them back on the hill with darkness not far away. They decide to go back the short way.

5 minutes into the journey, just enough time to get onto the busiest bit of SH1, you know, the really narrow bit at Pukerua bay, everything stops on Harry's bike and he pulls over into the gutter. Numerous attempts to restart the bike failed, and I ended up driving up on a rescue mission. I used all my mechanical skills, which involved staring at the bike and scratching my head, to no avail and we hid the bike in the bushes and came home.

The view from Paekak hill, it really is worth breaking down for.
 
 Motor-Ad picked up the bike, and discovered that there was only 130mm of oil in the bike, it had run dry, over heated, gone blue and broke. Apparently you need 1.5 ltrs of oil, something we didn't check when we bought the bike. There is a school of thought that would suggest that when you buy a bike off a guy who says - it's serviced regularly and goes like a dream, you'd think it would have some oil in it. There is another school - buyer beware.

Harry and I now know how to buy a knackered bike with a good engine, remove and replace an engine, and most importantly, how much oil you need in a GN250.  We now have -

  1. Really nice GN250 with a nice engine
  2. A knackered GN250 with a hole where the engine was.
  3. A GN250 engine with no bike, that rattles when you shake it.
And a half built boat.


Sunday, April 24, 2011

More Planks

People often say to me.. "what are you doing in my garden ???"

No, that's not it, people often say to me, "how many planks ?" It's the standard question now about the boat. The answer is 11. We have all 6 down one side and 5 down the other, which means if you look at it from the near side, it's pretty much finished.
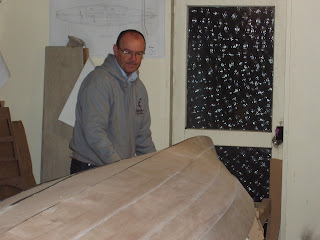
Can you tell what it is yet ?
As you can see, the port side is fully "planked".

The transom has certainly been a work in progress, but don't worry about the glue stains, Chris can sand those out.

The photo below really gives you a sense of her shape.

As Chris said, you have to admit, it's starting to look a little bit like a boat.

Oh, and yes, plank six, is covered in clamps. Be patient. I'll take them off, sand the ends and take some more photos.
Did we mention that we made a LOT of clamps.

Monday, April 11, 2011

Division of Labour

We have just completed plank 5 (from outer space?) on the port side, and with the starboard plank to glue and then the trivial task of fitting plank six, we seem to finally have a repeatable process that has streamlined the build.

If only we'd worked it out on plank one, we'd be floating by now.

We can now fit a plank in two sessions. Unfortunately it's a chicken and egg situation so I can't describe it from start to finish - given that the last thing we do one session one, is preparation for session one of the next plank, hang on, the last thing we do on session two..

Session one, or two -
  • Scarf the planks for the next but one session
  • Glue the plank from the previous session to the boat.
  • Mark up the boat for the planing and chiseling for the next session.
  • Glue the plank from the current session for the next session.
Session two, or one -

  • Plane and chisel the boat in preparation for the next plank that we've half glued in the previous session.
  • Shape the transom for the plank for the next session.
  • Chisel the let in the fore and aft of the next plank.
  • Glue the other third of the scarf joint on the previous plank for the next session.
Luckily, Chris and I seem to have fallen into a division of these tasks so that we can work in parallel without having to supervise or hold each others (metaphorical) hands. Although we often offer each other advice or feedback, only this Sunday, Chris told me "Mmm, that was a great cup of tea".

Given that Chris lives half an hour away, I could actually do a lot of "my" jobs in his absence. Luckily we have also worked out another process.

All the other sessions -
  • I phone Chris and ask if he's coming to build.
  • He replies - "I'm on crowd control" (looking after the kids).
  • I say "That's ok, I'll glue that plank so it's ready for the next session"
  • I walk into the garage with the best will in the world, and keep walking to the TV room above the garage and watch sport on the telly. 

Workers of the World Unite.
    Coming round to build the boat tonight ?
    No, got to look after the kids...
    Oh, ok. I'll go and watch the telly.


    Seems fair.

    Thursday, March 31, 2011

    Progress Report

    Just some pictures of the boat: we are just over halfway with the planking and it's getting easier (we're getting better at it and more confident). The biggest task will be, I suspect, removing all the excess epoxy on the inside after we turn the hull over.


    (Clicking on any of our blog pictures will open a larger version)


    The bows are a thing of great beauty - we've taken great care to ensure clean, smooth lines.


    On the other hand, Joe is not, by any stretch of the imagination, a thing of beauty:


    Saturday, March 26, 2011

    Waikato? Pah!


    Jock Wishart is a friend of mine. I think he may be partly to blame for this project, along with others such as Hobbs, Colin Fellows, Malcolm Knight and Mike Hart, whose tendency to do extreme things in rowing boats has rubbed off on me in a small way. I should also apportion blame to Gill Fellows, who was my first coach in the noble art of skiffing.


    Jock has turned up in my life with a spooky consistency: I first met him back in my university days, when he inspired our crew and gave us the belief to win our little event.

    He isn’t always the best communicator: a product of his independence and focus, I suspect, but he always remembers people and kept in touch over the years. In the early 90’s, he rang me up to inform me that he had accepted the role of Head Coach for the Oxford University lightweights on condition that I join his team. For me, that was possibly the catalyst that has led to coaching, both rowing and business, becoming ‘my thing’. After turning around the fortunes of OULRC, Jock moved on to other things. A few years later, he cajoled me into rowing with him for a couple of seasons with a crew of veterans: I recall we won most of our races - it would be churlish to allow facts to interfere with that picture.


    A spinoff from all this was his invitation to me to run the team selection and development processes for some of his wacky adventures: we started by building a team to walk to the Magnetic North Pole. Here’s the thing: although Jock dreamt up some fairly wild ideas, they tended to succeed because the
    y were founded on careful preparation. Plus he was able to motivate experts in their field to contribute.


    In one 18 month period in the 90s, he rowed across the Atlantic with a tough cookie called Duncan Nicholl (I helped select Duncan, without telling Jock that the key criterion was the ability to put up with…er, Jock), led the crew which established new speed records for powered circumnavigation in a trimaran and captained the team that broke the London-Paris rowing record in the CNA Maritime Challenge. The latter brought all of these mad rowing types together, along with the great Andy Ripley, who has the distinction of being the heaviest cox I have ever had to pull along, but also the funniest.

    Along with all of this, Jock represented his country at rowing and yachting and is a veteran of the 1980 America’s Cup, as well as being a former European Dragon Boat Racing Champion. A British University championship medal winner in rowing, sprint canoeing and weight lifting, he was Project Leader of the team that broke the Round Britain powerboat record in 1989.

    A lifetime interest in polar exploration led to him becoming a member of the first team to walk unsupported to the Geomagnetic North Pole in 1992. Four years later, in organising The Ultimate Challenge, the first ever televised trek to the Magnetic North Pole – an expedition comprising largely of novice explorers.

    Now, he is off on another one: he is going to try to row to the Magnetic North Pole. This puts our trip down the Waikato into perspective!

    The expedition to the Magnetic North Pole (as certified in 1996) will set off from Resolute Bay in July/August 2011, the crew plan to row for 450 miles before finally reaching the Magnetic North Pole at 78 degrees, 35.724 minutes North, 1

    04 degrees, 11.915 minutes West.


    The Ice Boat

    For the full story, have a look at www.rowtothepole.com :


    Monday, March 21, 2011

    It's About the Boat, Lance...


    Looking back, we've spent a lot of time talking about the preparation for the bit where we actually crack on and build something recognisable as a boat. Since Christmas, we have made considerable progress, so here, for the benefit of both the readers who give a stuff about the build, as opposed to Joe's therapy-by-blog, are some roughly sequential pictures of what's gone on since January.

    You may recall that we spent a long time setting up the moulds on the strongback.


    We then attached the stem and the inner keel, or hog, then the sternpost, which would later have the transom fixed to it...


    At last, we got the first plank onto the keel. A very exciting moment, but despite appearances, we didn't have enough clamps!


    The second garboard plank fitted perfectly alongside the first. Having made this start, each subsequent plank had to be carefully shaped, or 'faired', to receive the next. The tools of choice here were the plane and, now Joe knows what one is, the spokeshave.


    Working from the bows to ensure a precise fit (the planks had useful pinholes to align with the moulds), the second plank on the Port side was shaped and fitted. Another milestone, since, in achieving this we had more or less encountered all the challenges that the planking would offer.


    From this point forward, we should merely repeat a process until the hull is complete.


    .
    .Yesterday, we fitted the third plank to the starboard side, marking the halfway point in the great planking exercise. The transom has to be shaped to receive each plank as we go along, in case there is any deviation from the plan.

    I am sure you will agree that it's beginning to look the biz....


    Thursday, March 17, 2011

    Rowing Interlude - Twizel Sticks.

    While I wait for some glue to dry, here's a quick interlude to talk about the 2011 Rowing National Championships in Twizel. Partly because it's the main reason we haven't made a lot of progress with the boat.

    Chris and me both coach rowing crews. This season he was helping with the Wellington Rowing Club Women, and I was responsible for the WRC Novice Women. I could fill t'internet with the highs and lows of coaching a rowing squad.

    The rowing champs this year were held in Twizel, which is in the heart of Mackenzie (Mc?) country in the middle of the south island of New Zealand. So, imagine you are in the most remote country in the world, then go to the emptier of the two islands. Then, drive as far as you can away from the biggest city on that island, into the remotest part, and there you are, in Twizel. Apparently its a real draw for the tourists. I didn't actually see any, but there was an Irish girl who worked in the bakery who was apparently "doing her OE". Not technically a tourist, but almost. Oh, and the Irish girl who works in the pub, that's the same one, so that doesn't count as a influx of foreigners.

    
    Amazing scenery as the crew complete their budget parachute.
    
    Anyway, there's amazing scenery, fantastic water, two Four Squares and a couple of pubs. Luckily we had a lot of rowing to do to pass the time.

    Oh and we did go on a super cheap parachuting trip. 


    I suppose you'll all want to know how we got on. We made two A finals, which is a great acheivement at national level. Unfortunately, the even greater achievement of getting a medal at nationals eluded us and we finished fourth in the eight. It was a tough event, made even tougher by the  Rowers to Rio crew. The criteria for getting in their crew was to be between the ages of 18 and 21 and be over 6 feet tall. We had a rower who qualified for their crew on height, but missed the age cut off by 28 years. We also had a rower who fit the age qualification, but missed the height qualification by a foot.

    We all had a great time though, I'd like to think the girls learned something about opperating in a team, and a bit about themselves. And they also learned what it's like to come fourth... F*%king S^%t!!! That's how it feels. Here's the team, feeling a bit better.

    WRC Novice Women 2011 (can you tell which one is me?)

    So, that was the week that the boat was left to settle on the mold before the application of planks 3-12. Unfortunately, Chris couldn't make it down to Twizel due to work commitments. But he very kindly avoided doing any work on the boat, he clearly didn't want me to get jealous.

    Tuesday, March 15, 2011

    Plankety Plank - part II

    Bloody hell, talk about a long time between drinks.

    We have made good progress on the planking, but terrible progress on the blog. In Plankety Plank Part I, I think I left you on tenterhooks as I donned a pair of rubber gloves and mixed a pot of glue to "stiff peaks". I can only presume I explained the process of wetting out the inner hog and the underside of the garboard plank. (Hark at me, talking like a boat builder).

    After this, there was some discussion between Chris and I as to whether we should apply the thickened glue to the hog, the plank, or both. We settled on both, and lots of it! Then its just a case of.
    • Trying not to cover yourself if glue
    • Lining up the forward alignment hole on station 1
    • Clamping the plank to the hog
    • Trying not to cover yourself in glue
    • Working towards the stern and aft from the centre with more clamps
    • Starting to get covered in glue
    • Trying not to get glue all over the planks
    • Screwing the plank to the stem and sternpost when the contours get a bit severe.
    • Bollocks, there's glue everywhere now.
    We learned a few important lessons during this process, and worked out for ourselves a couple of useful tips. The most important lesson is that you can never have too many clamps. Luckily at the garboard plank, you can use screws into the hog. We were determined to make more clamps.

    See the natty ply washers in the foreground
    We also learned how to make washers with left over ply - a really useful technique if you don't want to dent your boat. I could write a blog on that alone. But I won't, I promise.

    So, the garboard plank, well one of them, is done. Look - there's a picture up there

    Monday, March 7, 2011

    Will I forever be in the shadow of my Father.

    Quite possibly, he's about 4 inches taller than me for a start off.

    When I was a kid, my dad used to buy me balsa wood and tissue model aeroplanes for Christmas, and we'd sit down on boxing day to build them. More precisely, I would watch as my dad built them and cover them in tissue and dope. We'd then go to a local park where we would turn them back into something like the original collection of balsa that came in the box.

    As I got older, I would become more involved in the building and the models got bigger, rubber bands were replaced with cox .49 glow plug engines and I would fit radio controls to prevent the inevitable impact with mother earth. And then one year, I bought my dad a rubber powered balsa model for Christmas. We had come full circle.

    Anyway, enough sentimental back story.

    My sister in the UK had a bit of a whip round and we bought my dad a model boat for his birthday - January the 10th. It arrived about a month ago, and the bastard has done this. He's already miles ahead of us. What a git.

    Ok, it's only a little one, but he's catching up.

    Friday, February 11, 2011

    Plankety Plank.

    No, not one of my favorite game shows, where you could win a blankety blank cheque book (useless) and pen (biro?).

    No, we've started to plank.

    This means that we are now starting to see the actual shape of the boat, and obviously, really start to panic that we've got it all wrong. Luckily, whenever things look awry, Chris counters with "remember, it's not an exact science". Unfortunately, Archimedes proved that displacement is an exact science and if there's more weight in the boat than out if it, we will displace the mighty Waikato and sink. Using another exact science, the one that proves that witches sink (circa Monty Python and the Holy Grail) , both Chris and I are heavier than ducks and therefore will plummet to the depths just north of Tourangi if there is a leak.

    Moving on, some building stuff.

    We decided that we should bite the bullet and glue the first plank to the hog.
    This was also the first chance to try the West Systems pump system that the guy at Barton Marine gave me (RRP $35). I was doubly excited - a new toy, and free stuff.

    
    Chris wets the hog.
     So, first, Chris covered the hog in the epoxy mix, this process is called wetting, or whetting. This process stops the wood drawing all the moisture out of the thickened epoxy and provides a key. Anyone who's dipped a brick in water before applying mortar will understand this process.


    The next stage in the process is to wet the garboard plank. We did argue over the amount of wetting and epoxy we would need to keep the planks in place, but we decided the resulting weight gain on the boat would be the equivalent of about one extra pint, so we must remember to drink an extra one on our first night to make up for the extra glue.

    Then we added a mixture of fine sawdust and fine white stuff (West systems epoxy hardener) to the epoxy. This turns it into glue. The consistency is not clearly described in the instructions, so we went for Delia Smith's instructions for meringue mix, thick peaks.

    Later I will describe how the sight of me donning latex gloves to handle the glue prompted a series of flashbacks from Chris who thought he was back in the holding cells at Wandsworth and I was about to perform a cavity search.

    And, when we found that, yes, we would need more clamps!

    Wednesday, February 2, 2011

    Hog Warts removed


    The scarphing challenge has occupied quite a bit of our time, but next up on the critical path was the business of shaping the Hog. This is the long strip of wood that forms the keel on a traditionally constructed boat. In our case, however, it refers to the inner keel only: modern construction calls for the planking to be sandwiched between two such strips, which means a very much simpler job of fitting it all together.

    The piece in question started out as a 6 metre length of Fijian Kauri with a rectangular profile. Our task was to shape it so that the constantly changing angles of the planks would sit fair (flush) on it. It had already been fixed to the stem and stern, as reported in fascinating detail in previous blogs.

    Thanks to some creative thinking and bold use of Joe’s second hand Stanley plane, my new spokeshave (my Christmas present from my dad) and a sander, we got a very pleasing result.


    Once we had the Hog shaped to our satisfaction, we then began the lengthy process of fitting the first plank in place to make sure that it was ready for gluing. This was an iterative process, involving endless repetition of various useful sayings, such as "We need more clamps" and "Of course, it's not an exact science" as well as frequent trials where we 'offered up' the plank in the

    vain and vague hope that it would realise that it needed miraculously to conform to shape.


    The bulge in the middle of my body is, as you will have guessed, the effect of a wide angled lens.


    Offering up the plank, while trying to look professional


    .