Friday, December 8, 2017

Home stretch


 The final stages for the boat: everything is varnished and I have finally fixed the seats in place.
I admit to a bit of nervousness because of the finality of this step and, although I know it should work, the idea of a boat held together by epoxy still doesn't feel right. On Harry's advice, I drilled extra pegs under each seat to ensure a good bond.

I keep thinking how little progress has been made since some very early pictures were taken, showing seats and knees in place, but the big difference is the deep shine from the many layers of varnish.

One of the remaining steps for the interior is to fix the mahogany strips that will support the foot stretchers. I have epoxied these in readiness. Ensuring they fit well was important, as they need to provide a snug slot for the foot stretcher boards, which  sit across the boat, but also slope back towards the stern. At the same time, the hull also flares outwards. All this added up to mean that every one of the strips had to be shaped individually.

Luckily, Joe took the precaution of numbering them once they were right, so they should fit without any further work...I just don't know whether he numbered them from the stern or the bows. 

I'll guess. 

Monday, November 13, 2017

Asymptotic progress


Restricted to short bursts of activity, I have been edging the project along, sanding the multiple layers of varnish on the outer hull in preparation for the final coat and working on a good finish on the seats and the rudder.


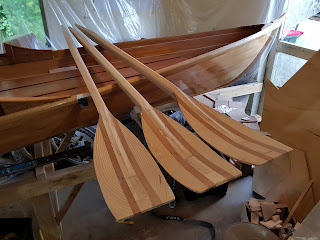
After several sessions shaping the oars, I took the plunge and applied the layer of reinforcing fibreglass cloth to the spoons. Immediately, the rich colours of the wood came out, as well as, just as I did the last one, Joe's advice about how I had done it wrong and how to do it properly.

It doesn't look bad, but, yes, I should have wrapped it around... Never mind, I have a cunning plan involving a spider, a bird, a cat, a dog... we may have been here before.

Fibreglass cloth applied with epoxy


Not surprisingly, the last one looked best.

Trimmed and sanded: see the contrast in colour, too.

Wednesday, October 25, 2017

Fun times

Spring, and the rowing season kicks into a new gear. The serious athletes have been training long hours through the winter, but rarely getting into boats because of the conditions.
The long weekend just past gave us a chance to make some real progress on building crews from our respective squads. Joe is looking after the Senior and Intermediate women and, at long last, real continuity from one year to the next means he's able to develop, rather than build from scratch. I have the novices, who are lots of fun and making great improvements.

Which is yet another way of saying that the boat hasn't had a lot of attention for the last few weeks. Not entirely true, though: I have been varnishing, sanding, varnishing...and the results are pretty satisfying.

Rudder, seat back and thwarts
The rudder and the seat back for the coxswain have a thin seal of epoxy: even that makes them look warm and colourful. They'll get a few layers of varnish and take on the slightly deeper hue that you can see on the seats.

The interior is beginning to look very shiny as the layers build up. Probably a light sand, a last coat, and that will be our lot.


The breasthook has always been our special feature and this finish is just gorgeous:

Done with a brush only.

This week, we can drop in the seats and foot stretcher fittings, spin her over and add the last layers of varnish to the hull, then we're done.

Not entirely bad...

(Apart from the oars, that is...)

Thursday, October 5, 2017

‘Hang spring-cleaning!’

It seems that a dog ate Joe's blog, so you are stuck with me once again.

A nasty cold kept me away for a couple two weeks, but I got back to it a recently. Each time I leave the oars, I think they look great: when I come back to them, I can see that more work is required.

I spent a little more time on the rudder, which came up beautifully after a progressive sanding.  I wiped it down with a damp cloth, which gave some idea of what it will look like with a varnish coat:

Stunning colour


The weather is changing, which is important because it means conditions will be better for applying the last coats of varnish.  We have already sprayed several coats on the hull, inside and out, but the finish is uneven and quite disappointing. I have therefore done quite a bit of sanding of the inside of the boat and, when that gets too tedious, I turn to other bits and pieces.

We are planning to put glass fibre on the spoons and part of the looms to add strength, so I experimented with some offcut wood, to see how it all works. The glass fibre cloth moulded very easily to shape and a layer of epoxy fixed it beautifully. Once that layer dried, the weave of the cloth was very obvious, but a light sanding, followed by a layer of varnish, gave a smooth finish and the cloth became almost invisible.
A test piece with glass fibre

I found a series of videos on You Tube, posted by Nick Schade of Guillemot Kayaks: if you want to learn some good stuff about woodworking, he's very, very skilled. He also has all the right tools and they are all sharp! (www.guillemot-kayaks.com).

I watched Nick applying varnish to his kayaks. With a simple technique, he gets a perfect finish, using a brush. Basically, he goes once with the grain, once across, and then once with again. He keeps to a relatively small area ( a couple or three feet), changes to the other side, repeats and then back to the starting side.

I decided to have a go on our seats, which had previously been sealed with a layer of epoxy. I was thrilled by the result and am wondering whether to abandon the spraying altogether:

No brush strokes here.
Once the first new coat had dried, I sanded very lightly with 240 grit, rubbed over with a kitchen scourer, wiped with a tack cloth (a soft, slightly sticky cloth to pick up the last of the dust) and applied a second coat. Very pleasing.

Monday, October 2, 2017

The seven-year itch


Nothing to do with boat building
Well, we've quietly slipped into our eighth year of this project. I recall laughing at someone else's blog when they had taken over 2 years to complete!

It really doesn't seem that long and, as I have said before, the actual time spent building is probably more or less within the 200 hours that the supplier of the plans and kit predicted.


Image result for pile of wood image


The Kit (saw not provided)

Plenty has happened in the years since we started: Joe's kids have grown up and left home (well, not Harry, obviously). In 2010, my eldest boy, Owen, was in his early days at primary school: he started at High School this year.
I am sorry to say we have both lost our mothers in that time.

Between us, we have won lots of medals as coaches and made a decent contribution of effort and guidance to Wellington Rowing Club. Generally speaking, those who won congratulated themselves, while those who lost blamed the coaches, which is, of course, entirely fair, though Joe and I have observed a spooky correlation between training properly and those medals (probably a coincidence).

I think I can speak for both of us when I say that, despite a vague sense that we ought to finish this project, we are pretty much happy with what we have done and how we have done it. The boat is beautiful and will be finished, but that's not the point: the fun has been in working together, solving problems and learning new skills.

I am looking forward to the next seven years...


Thursday, September 14, 2017

The River

        "He thought his happiness was complete when, as he meandered aimlessly along, suddenly he stood by the edge of a full-fed river. Never in his life had he seen a river before—this sleek, sinuous, full-bodied animal, chasing and chuckling, gripping things with a gurgle and leaving them with a laugh, to fling itself on fresh playmates that shook themselves free, and were caught and held again. All was a-shake and a-shiver—glints and gleams and sparkles, rustle and swirl, chatter and bubble. The Mole was bewitched, entranced, fascinated. By the side of the river he trotted as one trots, when very small, by the side of a man who holds one spell-bound by exciting stories; and when tired at last, he sat on the bank, while the river still chattered on to him, a babbling procession of the best stories in the world, sent from the heart of the earth to be told at last to the insatiable sea."


Sunday, September 10, 2017

Not the Yorkshire Ripper


Nowadays, "bodging" means doing a shoddy job or perhaps fixing something using the wrong materials. Bodge and botch have merged in meaning. Strange, since, originally, a bodger was a highly skilled craftsman: a woodworker in the furniture industry. Their particular expertise was in shaping wood to make, for example, chairs. I am guessing that the term related to forcing something (wood) to fulfil a different purpose, hence the idea of a bodge being a fix or shortcut. Bear with me, I'll research further.. or perhaps not.

Back to the oars...

They're shaping up beautifully as a result of a huge amount of sanding and careful planing. (Yes, planing, not planning.) Having transformed them and wiped off the blood and sweat, I proudly showed them to Joe, recently returned from his fact finding mission beyond the Wall, who commented that they needed a lot of work and went off to get a pie.

OK, he is right. The tricky challenge is shaping the surface of the spoons, so that there are concave scoops, on either side of the spoon, up to the spine or ridge that is the continuation of the loom. These also taper away towards the tip of the spoon, so there's a complex set of curves to be achieved. In addition, they have to be consistent on all four blades. This old skiff blade might give an idea of the desired result:


Someone prepared this earlier, then couldn't wait and took a bite from it.

The mahogany strips in our blades, being relatively hard, make our spoons doubly difficult to work.

So, I have been searching for a way of creating a concave shape. One solution is to wrap sandpaper around a suitably curved block (the curve is both along and across): something like a short banana. However, that is still slow going.

Yesterday, I came across the solution used by - who would have thought it - furniture makers. It's a thing called a Travisher, I kid you not. 


Yes, we have bananas


It's basically a curved spokeshave. The next time you sit on a comfy old wooden chair, the chances are that it was shaped using a travisher.
Properly bodged
The next thing I discovered is that travishers are very expensive, and not, to my knowledge, available in New Zealand. If you have one lying around, send it, post-haste.

Obviously, rather than wasting my time on laborious sanding, I set about making one. Immediately abandoning the idea of superheating a strip of steel to bend to shape, I used a length of old saw blade that I found in my shed, grinding it to give a razor sharp edge:


I then constructed a device for holding this. It's not pretty, but a work in progress:


After much clamping and swearing, I got the blade to fit, held by the circular central block. 

 
 And gave it a go.

The good news is that it actually worked. However, it was evident that a sturdier blade is required. And it was bloody hard work and pretty useless. I think it's fair to say that I bodged it.

So I went back to sanding, with careful use of scary power tools. You are probably less thrilled than I by pictures of not-quite-finished oars, but here's some real progress:


Yes! The ridge emerges!


(The light colour of the wood makes it hard to see the shape in these photos, but if you were to click on them, you would see it better)


Yes, I know there are only three here. That's all I had time for. Can't wait to have another crack at it tomorrow.


Thursday, September 7, 2017

The Manawatu River


The Poseidon Adventure

Keen readers of the blog will have picked up the fact that Joe and I both coach rowing. It's our main excuse for the relatively slow progress on completing this project.

I have been working with the novices at the club. It's very rewarding, not least because it gives the chance to work with a blank canvas and to avoid many bad habits. We have a great squad this year: they are very keen and are training hard, but, perhaps most important, they share a good attitude.

Lack of water time is the constant challenge for any rowers in Wellington, so any chance to get out there is seized. Sometimes that can lead to an element of risk, so we are usually very careful, even over-cautious.
On Tuesday morning, nine eager athletes turned up at a shockingly early hour, lured by Dave's promises of good water. Unfortunately, the weather was what might be called marginal (think Hurricane Harvey), but they made the decision to give it a try. They set forth in the ominously named Poseidon...

What happened next was a timely reminder that our sport is, in fact, quite dangerous. After a brief excursion out into the harbour, it was obvious that conditions were worse than feared and the sensible call to head for home was made.

It was claimed that "two massive, freak waves came out of nowhere" ....

"For goodness' sake, 6, get in time!"

To their credit, no-one panicked, and they managed to get the boat back to shore, despite most of it being submerged. 

"I think the crabs have caught us..."

Poor old Sam, who had nobly volunteered to cox, must be wondering: the same damn thing happened to him last year on the Manawatu.

Relieved that no harm was done, but shared experience is what builds trust and thus teams.

Tuesday, August 29, 2017

They're bridesmaids...

One of the trickier challenges in this boat building exercise has been the construction of the oars. The basics were simple and we ran up four roughly shaped examples in a few days, even allowing for my building one back to front and the subsequent correction.


Rough shaping the spoons


However, shaping them so they would 1) match and 2) look 'proper' was something we baulked at. Despite suggesting to Joe that he could whittle away of an evening, while watching Game of Thrones or some similarly undemanding nonsense, the oars remained untouched for over a year. I spent hours trying to work out a method for guaranteeing a uniform and seaworthy shape.


The basic shape


Well, today, I decided just to get on with it. I started with this. You can see the thickness of the spoon:


I got out our small plane and set to. To my amazement and delight, within a short time, I had brought one to a state of 'almost perfection' (see earlier blogs for definition of this term):


One done, see the difference!


Only the need to feed my boys prevented me from continuing into the night: I shan't sleep with the sheer excitement of knowing that, tomorrow, I shall get all four up to scratch. Unless, of course, I make a cock-up.

No, that's very unlikely. Isn't it?

Friday, August 25, 2017

Change of direction


Building the boat with company is fun: an unbroken stream of rowing chat, bad puns, philosophical discourse that would put Pete and Dud to shame and repetition of formulaic jokes turns the tedious tasks like sanding and gluing into a social event. There are also genuinely challenging problems to solve and techniques to learn that make it really interesting and rewarding.

The last few weeks, working on my own, have been rather dull, to be honest, though I have made progress and Harry and Kim have been there ready to hold things when needed. Unfortunately for you, gentle reader, this dullness is coming out in the rather mundane style of the recent blogs. Either that, or Joe simply has a better way with words. As long as he comes back with the leathers for the oars, I am prepared to say I am looking forward to his return.

Here's what accounted for a fair chunk of my time in the last week:

This is the rudder that we made from ply a few years back. The idea was deliberately to show the ply as a key building material and, by exposing the layers as the rudder tapers to the tip, the striations gave it a special look.


As confessed earlier, I wasted hours of work by hastily attaching the fittings in what turned out to be the wrong position, spoiling the beautiful finish in the process. I am not at all happy about messing this up: I made a mistake that might have been recoverable, but my attempts to remedy it only compounded the problem. Having swallowed the spider, bird, cat, dog, goat, cow and most of the horse, I gave up and decided to make an entirely new rudder from scratch.

I started another ply version, as I mentioned earlier, but felt that it just wasn't going to work out too well.

Ply sandwich
Marked up

So now, when Joe gets back from his in depth research into the yachting scene in Croatia, or cruising in Brighton, he can choose between two versions:

Mahogany and Fijian Kauri
Ply version, before sanding


The Kauri will be relatively light coloured, but, with varnish, darker than the above. The new ply is much lighter - almost a cream colour -, but will also darken with varnish applied. I may experiment with some staining, too. It remains to be seen whether the grain and knots that are showing will enhance or spoil the look. So far, even poor quality ply has yielded a very pleasing finish.

On the other hand, the Kauri does look good and I have invested quite a bit of effort in it, having added all that mahogany....