Wednesday, September 30, 2015

25-28 and the return of Edward The Compressor

Joe, like many Englishmen, loves almost all sports. Also, like many Englishmen, disappointment is tempered by the fact that there's always something else to look forward to: the failure at the Rounders World Cup is swiftly followed by the Ashes series and a feeling of redemption. I am enjoying a brief period of pure joy, ignoring the looming threat of Fiji and the increasing likelihood that Warren will be on the phone asking me to get the Dubbin on my boots once more.

So, the result at the weekend, instead of creating a tension in our workshop, has been swiftly set aside as Joe focuses on the next thing...er, whatever that might be.* The rules dictate that a certain amount of gloating is required: it's part of the healing process, so I have tried to help as much as possible, but his sunny disposition makes it an unrewarding game.

We are now hurtling towards completion of this project. Phase One, at least: Phase Two will be the row itself, which started as the big thing, with the building of the boat initially seen as a minor hurdle on the way. As the build progressed, the trip down the Waikato receded in our minds...but was never forgotten.

The exciting step forward last week was the declaration that we were ready to begin the varnishing of the inside of the boat. We need to make the seat back for the cox's seat, but everything else is now done, as far as the boat itself is concerned.

ET's tent has been resurrected, creating a separate spray booth that lets us do other things while each layer of varnish dries. The air is still a bit cold, which means the interval between sprays is more like 2 days (we managed one per day when we did the outer hull), so we have also started on the construction of the oars. With a bit of relearning, Edward the Compressor is functioning and we have completed three layers, spraying with  the confidence of a Welshman in a Twickenham front garden.
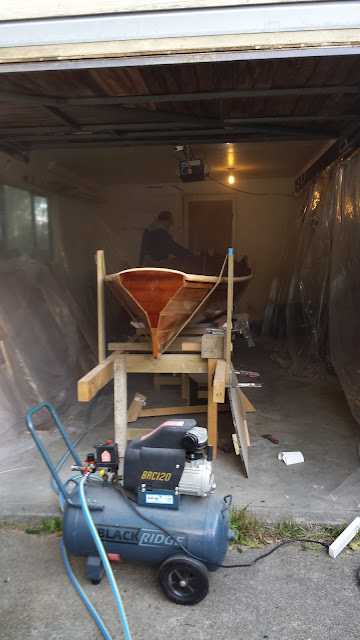
It's pretty foggy in there as Joe adds the latest layer, with Edward's noise making post match analysis difficult. Luckily, sign language offers an alternative.

Look forward to some fascinating insight into oar construction in the next few weeks.

* I expect England to beat Australia. If they do, I hope they'll have the good grace to do it by more than 7 points.


Monday, September 14, 2015

Almost Perfect

Chris has this habit of saying "Great, it's almost perfect" when he's working on something. I have discovered that this could mean anything from "It's not ruined" to "It nearly fits". Unfortunately, those who have been reading this blog will know that three years ago, the boat was Almost finished.

A couple of days ago, Chris declared the knees for the seats were almost perfect. Today, while Chris sanded the inside of the boat in preparation for the application of 8 coats of clear varnish, I decided to have a go at the knees with a rasp and various grades of sand paper. I spent about 2 hours on a single knee and ended up with this.

This is an almost finished knee, it just needs another rub down with very fine sandpaper, a few coats of varnish, final fitting to the boat, drilling and mounting.

Oh, and there are three more of the damned things.

Thinking about this, I decided there is a whole vocabulary of terminology I should explain to our faithful followers.


PROCRASTASAURUS (Or, words we use to describe how the boat still isn't finished)

Almost Perfect : It looks vaguely like intended and isn't broken.
Almost Finished : Nowhere near complete, requires hours of effort, and then 8 coats of varnish..
It's not an exact science : It doesn't fit.
Oops : I've chopped an important piece of wood in half by mistake.
When we build our next boat : We worked out how to do it just after we'd done it wrong.
Perfect : Actually pretty good, probably by accident rather than design.
F*cking B*ll&cky C#nt W$nk@r!!!!! : I've hurt my finger.

And lastly, whenever we have a difficult job that could potentially, although probably not, be solved with an expensive power tool, we declare "Selfish git!". This is a reference to my mate Brendan who has emigrated to Australia, taking all of his tools with him. (Not all of them, I still have his jigsaw).

Anyway, when we build our next boat......


Wednesday, September 9, 2015

A Bad Week for Knees

Wales' warm up game at the weekend took a toll, with Rhys Webb, the brilliant scrum half, sustaining the sort of injury that makes you turn away from the screen. If that wasn't bad enough, the same game resulted in a knee injury to Leigh Halfpenny, probably the best goal kicker in the game, which has ruled him out of the World Cup. Given that we went out of the last one because we couldn't land our kicks, the significance of this loss is enormous.

When Joe and I turned our backs on this project to pursue other interests, we had pretty much made all the bits we needed and, crucially, we had sealed everything with epoxy, oil or varnish. Not so our knees....

There are knees everywhere in this boat: basically, L-shaped or triangular fillets that give structural strength to the boat. Those in question were intended to tie the thwarts (seats) to the hull, as in the picture below.

The knees in place on the two nearest thwarts
We made these knees from ply, which, though a fairly mundane composite material, can yield surprising results (regular readers will remember the striking pattern on our ply rudder). Here's one, close up:


The grain on this would have looked wonderful, once a few layers of varnish had been applied.

To our dismay, the damp weather that is a feature of Wellington for much of the winter had been at work while we were elsewhere and our elegant knees have been blighted by a mould that has penetrated beyond the reach of our trusty sandpaper: 

The black stuff
Nothing for it, but to make some more, this time with a solid wood that will match the Fijian Kauri of the thwarts. Fortunately, our high level of acquired skill with the bandsaw made that an easy task... except that this was when the bandsaw blade decided to snap. 

While we search for a replacement, I had a go at making the knees with the other tools: a jigsaw, a hand saw, a belt sander and a sanding block. Not a bad attempt, but the task got an awful lot harder...


I should have made an extra one for Leigh.


Monday, September 7, 2015

Stretcher Bearers

It is fairly obvious that the platforms for our feet are of considerable importance: even in a boat without sliding seats, the only way to connect the power of the oarsman is through the feet. That means that the foot stretchers* (boards) must be strong enough to take the pressure, as well as being at the correct angle to press comfortably. In addition, the stretchers must be adjustable, fore and aft, to accommodate rowers of different height.

We talked about the problem of working with 3 dimensions the other day: Joe helpfully suggested that the main problem was the 4th dimension.
Anyway, ignoring him... the boat tapers along its length, flares outward from keel to gunwale (bottom to top, lubbers) and the foot stretcher has a tilt (known as the rake) to allow the feet to press in a comfortable position. Of course, the supporting cleats (strips of wood) need to be parallel and aligned with the set on the other side.
All this left us with a complex challenge, which I was fully prepared to duck with a crude and botched fix requiring wedges and glue everywhere. Joe shocked me with the elegance and foresight of his solution..and more so with his persistence in getting it right, while I pretended to work on the rudder (occasionally I helped him with things like holding bits in position while he drilled holes, or, more often, dealing with surplus chocolate biscuits, provided by Kim).

We varnished the inside of the hull behind these cleats to ensure a seal before fitting them.
 You can see that there's a little bit of trimming needed, then the cleats will be fixed in place with glue and the screws already pre drilled.  


Joe's mahogany extensions to the stretcher board fit beautifully and give a touch of art deco that echoes the patterns in the bows and on the rudder yoke. 

Add straps for the feet, polish up with fine sandpaper, varnish: beautiful.
 Once we have the second of these in place, we really have done all the hard bits. Except for the oars.


*The term 'stretcher' means a support, brace or connector: so, the stretcher that carried Rhys Webb and a great deal of Welsh optimism off at the weekend has a related meaning. I bet you are glad you asked...

Tuesday, September 1, 2015

The best $2.40 I have ever spent.

For those of you who have been paying attention, you will remember that some time after the dinosaurs we got hung up on the foot stretcher fittings. Fitting the cleats (or sharks fins as they came to be known) required carpentry in three dimensions. A couple more than Chris and I had in our arsenal. Unfortunately, somewhere along the way, captain cockup snuck into the garage and chopped the ends off our foot stretchers. 

So, to complete the complicated three dimensional cleat arrangement, we first needed foot stretchers that fit. I made the visit to City Timber to buy a couple of metres of foot stretcher, only to be told it would be $60 and ready in a couple of days. I explained the problem and it was suggested I scarf a bit of mahogany on the ends and call it a feature. Not wanting to back down in the face of a woody challenge, I agreed. We chose a length of mahogany and the friendly assistant offered it to me for $5. I offered him the contents of my pockets, $2.40, we agreed I'd make up the difference on my next visit.  

Testing our scarph angles on about 35c
worth of Mahogany 
So, we are back to glueing scarf joints,  a bit of a problem when the temperature in the garage is slightly below freezing. I will be sending Chris an electricity bill having run a fan heater overnight. 


The bits of mahogany extending the foot stretcher
That's clingfilm, not ice.


After a morning of sanding, planing, sawing and routing, we now have two foot stretchers that we can offer up to the new fittings. Given it took us two years to solve the problem, you'll thank me for not describing the solution in this post. Trust me, each element has been finely crafted to a precise angle.


The stroke seat foot stretcher slotted into it's cleats can be seen in the last picture. We need to fit the remaining cleats for normal sized rowers, this first setting is for people more my size. We also noted that when we move the foot stretcher into the furthest position, the coxswain will lose his or her toes. Given the effort we put into this part of the boat, I am more inclined to learn toe surgery than to sort this little "feature" out.

Does the protractor on the deck convince you that this was tricky.